Active Sitting
Tune Up Your Power Train
As many a yoga teacher knows, most athletes struggle with the same three areas: hips, hamstrings, and lower back.
Weight-bearing endeavorslike running, biking, or golfask a lot of your hips and hamstrings in order to power your movement. And since both are closely connected to the lower back, it can end up sharing the burden.
From the runner with inflexible hips to the basketball player with shin-splints, here are just a few of the benefits yoga can have for athletes:
Stretching of tight and overworked muscles
Strengthening of under-utilized or weak muscles
Enhanced concentration and focus via yogas breath control
Expanded range of motion
Improved flexibility of tight muscles
Enhanced performance and endurance
Improved sense of body awareness
This short post-workout stretching sequence hits all three areaships, hams, and lower back. Even if you're thinking "I've got no time in my training schedule for anything else!," no worriesa little yoga goes a long way.
These yoga poses are safe enough to do at home on your own. Try this sequence every other day for fast results. Note: If you're not warmed up, don't push yourself.
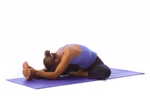
Seated Head-to-knee Pose
Why:
This is basically tree pose on the floor. And since by sitting you take any worry of toppling over out of the equation, you can focus on relaxing your leg muscles and extending your spine to open your hips outward. That counters the inward leg rotation required by most sports.
How:
1. Sit up straight with your legs out in front of you and bend your left knee, letting it fall open toward the floor to bring the sole of your left foot to meet the inside of your right thigh.
2. Take a deep breath in and on your exhale hinge forward from your hips and try to grab your left foot. If you can't reach your foot then use a towel.
3. As your hip opens up, your knee will fall toward the mat. Stay here for 5 to 10 deep breaths. Repeat on the other side.
Tip: Yoga is all about body awareness, so notice if there is a difference between one side and the other. And if one or both knees are bent dangling up in the air, prop a pillow or folded blanket under it or move the foot from the inside of your left thigh down to your knee or calf.
Butterfly with Blocks
Why:
Runners and cyclists, this one's for you. This pose is an efficient way to open the cardio-contracted muscles and connective tissues of the hip joints because it manages to hit both the inner and outer hips at once.
How:
1. Bring the soles of your feet together with knees wide apart. Sit up tall, take a deep breath in, and on your exhale hinge forward from your hips, keeping your back flat. Reach your nose toward your toes. (Don't worry if your nose isn't even in the vicinity of your toes at this point. It's the thought that counts.)
2. If this pose feels easy, remove the blocks and walk your hands out on the floor in front of you for a deeper stretch. If your knees are dangling up in the air, move your feet a little further from your body, use your elbows to push your knees down (gently!), or prop some pillows or blankets underneath them.
Tip: Make sure you're not straining your neck and head. Instead, focus on relaxing your neck and allow your head to hang forward. This release helps you sink deeper into the pose.

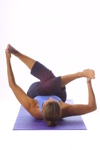
Pretzel Hip Opener
Why:
Hit your tight hips from another angle. Your hardest-working joints deserve the extra attention.
How:
1. From butterfly pose, bring your knees together then roll down onto your back. Hug your knees into your chest. Then bring your right ankle on top of your left thigh. Keep your left foot lifted off the floor.
2. Lace your hands through your legs to take hold of the front of your left shin and gently pull your left knee toward your chest as you push your right knee away from it. Try to hold this pose for at least 1 minute. Then switch sides.
Tip: If you cannot reach around your shin, just grab the back of your thigh. Be sure to keep your neck and shoulders relaxed.
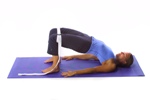
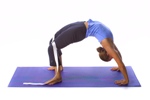
Bridge Pose
Why:
This pose will not only help you stand up straighter but also defend you against injury. It strengthens the lower back to help it endure the strain put on it by too-tight hip flexors and poor posture. And it also helps correct those problems by opening the entire front side of your body, including your stiff chest and shoulders.
How:
1. Lying on your back, hug your knees into your chest and rock side to side. Let your feet fall to the floor with your knees bent.
2. Bring your feet hip-width apart and reach down with your fingertips to touch your heels. If you can't, walk your feet in a little closer to your body.
3. Take a deep breath and on your exhale push into your feet to lift your hips toward the ceiling. Once you are up, if you can, bring your arms and shoulders underneath you and clasp your hands. Hold for 30 seconds and then release.
4. Increase your stretch in stage two. Reach your hands up and place them palm down on either side of your head.
5. Lift your entire body off the ground, raising the pelvis above the rest of your body until your back forms a bridge.
6.Hold the position for 30 to 60 seconds, breathing deeply as you hold your body in place.
7.To return from this position, tuck in your chin and lower the back and pelvis slowly to the floor.
Tip: Focus on keeping your thighs parallel (i.e., knees not splaying out), reaching your chest toward your chin, and pressing your hips up.
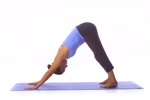
Downward Dog :
Why:
This poster child of yoga postures is wonderful for loosening tight hamstrings and glutes and broadening the range of motion in the shoulders.
How:
As the athlete performs downward dog, he or she should focus on breathing into those tight and restricted areas of the body while also using their breath to lengthen and strengthen the large muscles of the legs and arms at the same time. This posture should be done for a minimum of 10 breaths.
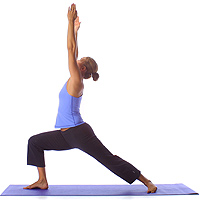
Warrior I
Why:
As its name implies, this powerful yoga posture cultivates both inner and outer strength while also keeping the mind focused and steady. How:
As the athlete performs this posture, he or she should focus on pressing through the back supporting leg while stretching through the ribcage and reaching through the arms. Perform the right side of this posture first and hold for five breaths and then repeat on the left side.